 Today's post: a form of horizontal surface decoration added with a crochet hook, a trick I call Fake Latvian Braid (FLB). Here is a photo of an easy little 3-row high teaser, but this barely scratches the surface: FLB can be used for many far more intricate braid patterns as shown lower in this post.
Background: Real Latvian Braid
Real Latvian Braid is a distinctive decorative element instantly associated with the famous and intricate Latvian mittens. (Want to see 4500 pairs of Latvian mittens in an on-line gallery? For a 2006 NATO conference held in Latvia, 250+ knitters made all these as gifts for the delegates. Funny to think a military conference would inspire such a resource.)Real Latvian Braid looks like a bar of knitting worked at 90 degrees to the rest of the fabric--a sort of horizontal trim. It can be worked in a single color, or in two colors, as on this mitten from the gallery, with its two lines of handsome black-and-yellow braid.
Real Latvian braid is a form of surface decoration created by a yarn stranded onto the fabric surface as the yarn travels from one stitch to another. It isn't difficult to do, here's a good video. Yet, whenever I see it, it reminds me of a similar-looking stranding you get from the slip stitch. So, with a bow to tradition, here's a TECHknitting version of Fake Latvian Braid (FLB) based on slip stitch.
Just like real Latvian Braid, FLB can be located anywhere in the fabric--so close to the cast-on that it look like it is the cast on, or in the middle of the fabric. Also like the real thing, rows of FLB can point right (tip of each stitch at the right) or point left. Unlike real Latvian Braid, which is knitted-in, FLB is a form of surface decoration done after the knitting is complete, making it easy to install, easy to remove, easy to re-locate.
Fake Latvian Braid (FLB) How-to
FLB nothing more than a crocheted slip stitch worked through a knitted fabric so that the two arms of the chain appear on "public" face of the garment. |
| Fake Latvian Braid (front)--chained appearance |
The back part of the slip stitch anchors the chain, creating a dotted or "stitched" appearance on the fabric back
 |
| Fake Latvian Braid (back)--dotted or "stitched" appearance |
The one-color version of this is the simplest. It is done just as you would use a slip stitch to stabilize a knitted fabric with the exception that it is always worked from the front face of the fabric, the point of the exercise being the chain decoration.
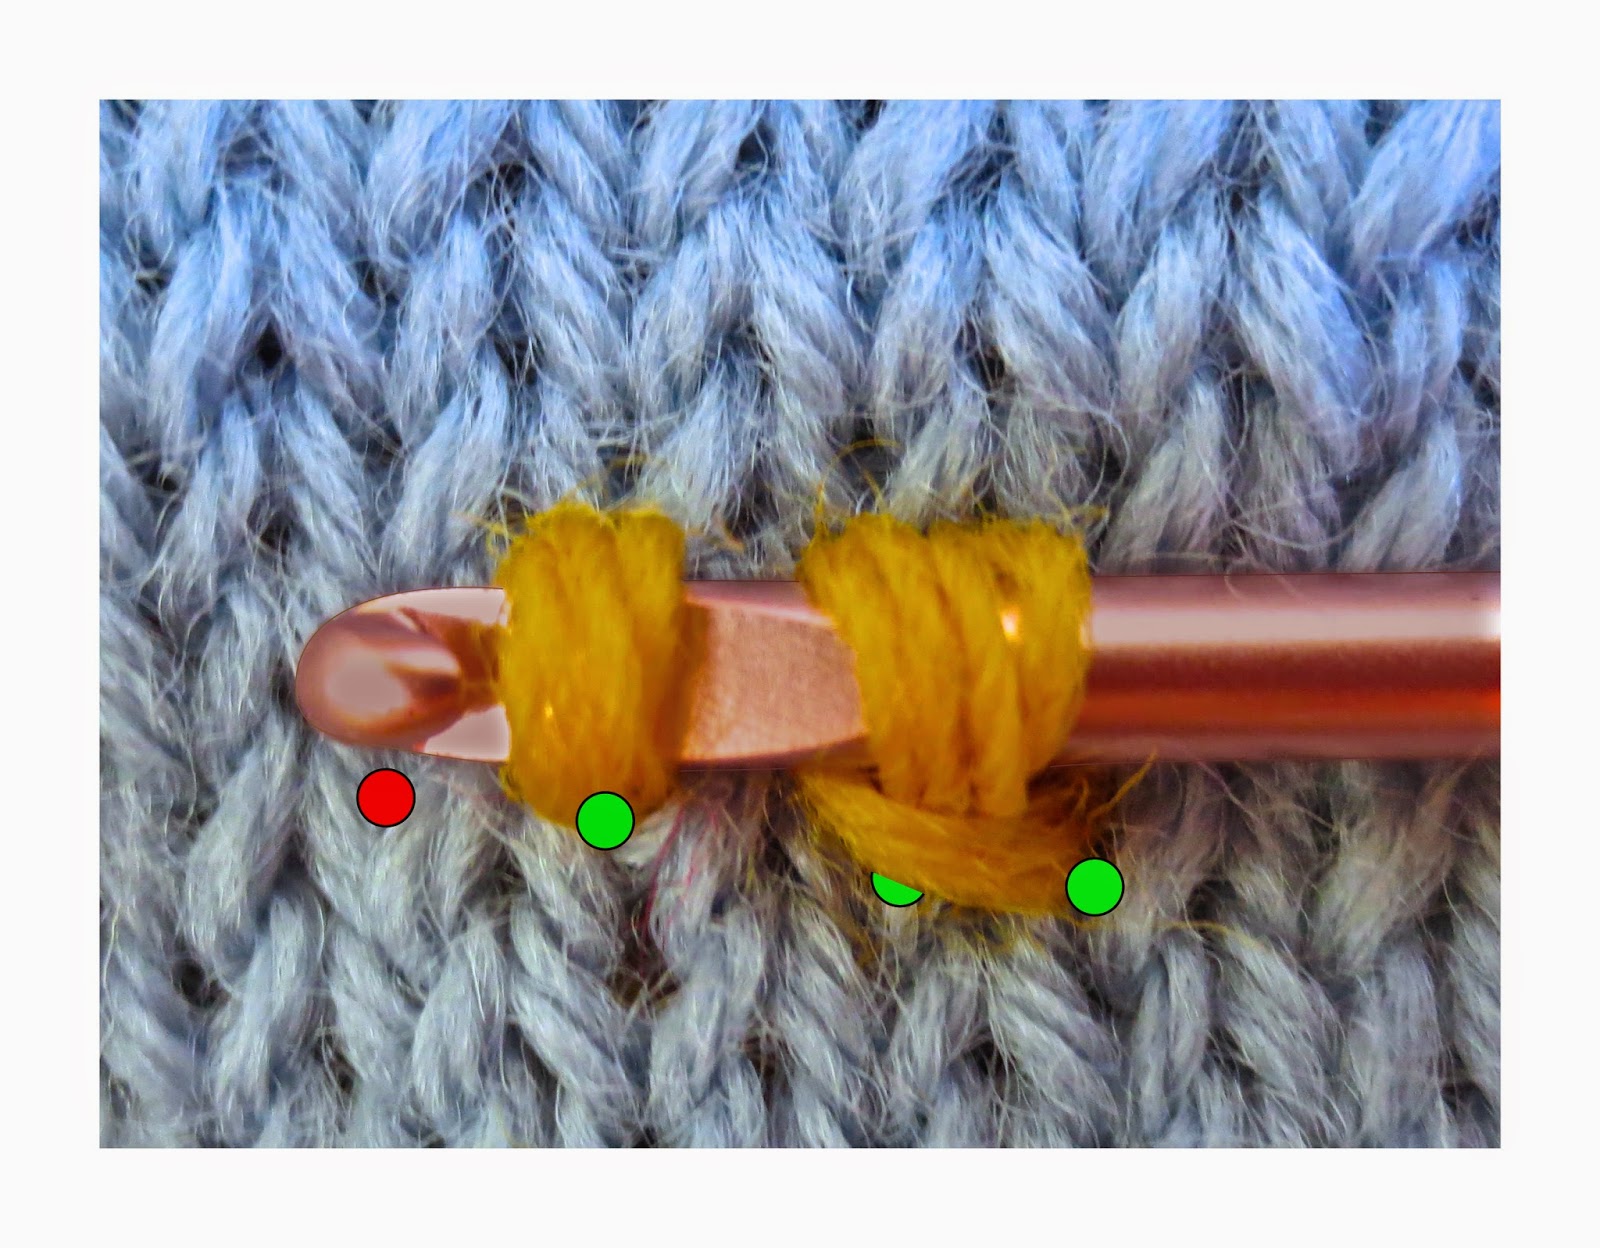
In the step-by-steps below,
- red dots show where the crochet hook is inserted
- green dots show the base of each pulled-up loop
- cc means the contrasting color yarn used to make the FLB (yellow yarn on the blue background)
 |
| FLB step 1 |
Step 2: keeping the loop around the barrel of the hook, insert the hook between the arms of the next stitch in the same row. Again catch the cc yarn, again draw a loop to the fabric surface, as shown below. This creates a new loop.
 |
| FLB step 2 |
Step 3: draw the new loop through the old loop.
 |
| FLB step 3 |
Step 4: repeat steps 2 and 3--as you draw up a new loop, the loop further down the barrel becomes the old loop.
 |
| First chain made. Repeat steps 2 and 3 for additional chains |
* * *
ADDENDUM, November 2015. Lots of knitters have written to ask---How do you actually DO the FLB without flipping the fabric back and forth? If you don't flip the fabric back and forth, how do you work with one hand behind the fabric?In answer, there is a new TECHknitting post called "The mechanics of slip stitching," which includes a VIDEO. Check it out...
* * *
FLB can be made rather flat, by using the same yarn for the FLB as for the garment fabric (thinner top braid). Or, you could make the FLB an almost structural element by using a heavier yarn than the one used for the background fabric, or even a doubled yarn (thicker bottom braid).
 |
| Single-yarn FLB above, doubled yarn FLB below: note these braids point left |
As you see, the narrow end of the stitches the above photo point left. There's no mystery to this: the narrow end of the stitch always points at the insertion point. To get a row of right-pointing FLB, work from R to L, as illustrated in the step by step instructions. Yet, to change the direction in which the FLB stitches point, there is no reason to awkwardly change the direction of your slip-stitching. Instead, rotate the fabric 180 degrees, which turns the fabric upside-down, then work the FLB in whatever direction is easiest for your handedness. When you turn the fabric right-side up, the braid will point the other way. (See pro tip 5 for more about how to make fabric rotation easier.)
FLB can also be worked along the top of ribbing. The great thing is, when worked along the ribbing/stockinette transition line, FLB combats flip! In truth, I rarely PLAN to work FLB along a ribbing, mostly I trot this trick out to combat band-flip when it shows up--a true "afterthought" use.
 | |
|
Pro tips part 1
1) If you want to combat flip at the ribbing/stockinette transition, but don't want the decorative effect, make the FLB in the same color and no one except another knitter will ever notice.
2) This anti-flip trick is also adaptable for stockinette roll, see "uses," below. It also has a first cousin you can use to control flipping vertical garter stitch bands.)
Two color FLB
So far, all the FLB samples shown have been worked in a single color. The two-color version is not a lot more complicated. It is achieved by holding two different-color yarns on the fabric back, then alternately drawing a loop of one color through a loop of the other color. Below is a single line of alternate-color FLB at the top of a ribbing. |
| Two color Fake Latvian Braid at ribbing transition zone |
To avoid having the running yarns twist and tangle around one another (as they always do with real Latvian Braid), hold each yarn in a consistent location (one above and one below) and draw the yarns alternately and directly.
Working a three- or more color FLB is certainly possible, also, but with each color added, the amount of bulk at the braid-line increases substantially.
Stacked FLB: Multiple-row braid trims
Here's the ultimate expression of this trick, the big payoff: intricate braid patterns made by stacking multiple rows of FLB worked in opposite directions or the same direction, in the same colors or different. All sorts of woven-looking "trim" effects are possible from stacking, below are schematics and photos. The dark box in each schematic shows the minimum stitch and row repeat.THREE ROW ALTERNATING-COLOR-ROW TRIM (2-way)
First up is one of the simplest--the post opened with this trim, and here is is again, this time with its schematic. This is a simple 3-row stacked design composed of alternating rows of solid color (so it's called "alternating-color-row" trim) with the middle FLB made in the opposite direction from the top and bottom ones (it's called a "2-way trim" because the rows of FLB go in two different directions).
|
| Three row alternating-color-row trim (2-way) |
 |
| Three row alternating-color-row trim (2-way)--schematic |
THREE ROW 1/1 ALTERNATING COLUMN TRIM (1-way)
This trim is composed of 3 rows of FLB, each worked in the same direction (which is why this is a "1-way trim"). Each FLB is made of single stitches of alternating color (which is why each FLB is called 1/1). The adjoining rows of FLB are stacked so that the colors line up in the columns (which is why this one is called "alternating column" trim).
 |
| Three row 1/1 alternating column trim (1-way) |
 |
| Three row 1/1 alternating column trim (1-way)--schematic |
FIVE ROW 1/1 CHECKERBOARD TRIM (1-way)
This trim is like the one just above with two exceptions: There are 5 rows of 1/1 FLB instead of 3, and the rows stacked so the colors alternate in the columns to create a checkerboard.
 |
| Five row 1/1 checkerboard trim (1-way) |
 |
| Five row 1/1 checkerboard trim (1-way)--schematic |
SIX ROW 2/2 CHECKERBOARD TRIM (1-way)
2/2 checkerboard trim is just like 1/1 checkerboard, except that there are 2 stitches of each color, and each square is two rows high.
 |
| Six row 2/2 checkerboard trim (1-way) |
 |
| Six row 2/2 checkerboard trim (1-way)--schematic |
FIVE ROW 1/1 ZIG-ZAG TRIM (2-way)
This trim is the two-way version of 1/1 checkerboard trim: in this trim, the second and fourth rows go in a different direction than the first, third and fifth. In other words, the same distribution of stitches either makes a checkerboard or a zig zag, depending whether the design is 1- or 2-way. You'll notice a little red-colorized tail of yarn at the bottom of the trim, the explanation is in pro-tip 3, below.
 |
| Five row 1/1 zig-zag trim (2-way). Note the red colorized tail at middle bottom. |
 |
| Five row 1/1 zig-zag trim (2-way)--schematic |
SIX ROW 2/2 ZIG-ZAG TRIM (2-way)
This trim is the 2-way version of 2/2 checkerboard.
 |
| Six row 2/2 zig-zag trim (2-way) |
 |
| Six row 2/2 zig-zag trim (2-way)--schematic |
Sources of inspiration for future experimentation include handwoven inkle trims, friendship bracelet designs, Norwegian-style trims. Exprimentation is low-cost. If you try a pattern and don't like it, FLB--stacked or single row--is easy to pull out.
Pro tips part 2
3) To keep the columns of stacked FLB trim from spreading, or to prevent show-through of the background color, you can use a blunt-tipped yarn needle to draw a matching-color sock yarn back and forth under both arm of the chains. To avoid puckering, watch your tension as you draw the yarn under the chains.  |
| Stabilizing FLB by drawing a yarn under the chains. This particular FLB trim is the 1/1 zig zag, so the yarn is drawn under offset yarns of the same color. For non-zig zag trims, the yarn is drawn under straight (not offset) columns. |
4) It is also possible to stabilize stacked FLB from the back, as shown below.
 |
| Stabilizing FLB from the back--this is the back of alternating-color-row FLB |
See for yourself: The right side-up fabric is to the L in each of the below photo-series has a little green dot in the lower R corner. When the fabric is rotated 180 degrees (upside-down) the green dot rotates to the upper L corner. On both orientations, stockinette fabric appears as a "V," although on the upside down fabric (green dot at upper L) the V appears a half-column over. If you were to work an FLB on rotated fabric based on the appearance of the V, the FLB would also be a half-stitch off an FLB worked on un-rotated fabric. In other words, the stitches of adjacent FLB rows would not align in the columns.
 |
| Right side up vs. upside down (180 degree rotated) fabric: both look to be composed of V's although the V on the rotated fabric (dotted line) is half-a-column over |
You can solve this problem without having to mentally turn each V upside down if you use a quilter's magic marker (color fades in an hour) to mark the center of the stitches. When you turn a marked fabric upside down, it's easy to see where to insert the needles: the V's upside down (^'s) are easy to pick out via the dots.
 |
| When marked, it's much easier to see the correct insertion point: the now- upside-down V's (^'s) |
Uses
- Refresh a tired sweater without unpicking a single stitch.
- Correct sagging: single-line or stacked FLB trim is quite firm, so any amount of sagging in cuffs, bands or facings can be quickly, beautifully and permanently corrected. New items decorated with FLB simply won't sag in the first place.
- Firm up too-loose garments: add a waistband to a saggy sweater, tighten a stretched mitten.
- Combat stretched-out seams and bands: Stretching hat bands, sagging shoulder seams and stretched out neck-backs are all gone with FLB.
- Make a matching belt to your sweater: stacked FLB will stabilize even a narrow fabric from rolling or stretching, especially if you stabilize the fabric per pro tip 3, above, then hide the back with a facing. Alternatively, you could make FLB reversible, by working some rows on the fabric front, and some on the fabric back--when the back of a chain shows, it makes a "stitched pattern" as shown in the third photo from the top, and this could be adapted as part of your design.
- Combat stockinette roll: as stated above in pro tip 3, a line of FLB worked along a ribbing/stockinette boundary combats band flip. It is also possible to tame stockinette roll with a multi-row trim right along the fabric bottom where the flip is. How many rows/rounds you have to work depends on how bad the flip is, but a 5- or 7-row trim usually flattens out even the most determined flip.
- Glitz it up: Add gold and silver yarn (or even metallised embroidery yarn) on a black mohair sweater=evening wear from an otherwise plain knit.
- Add a trim of school colors to a solid-color store bought sweater...
Good knitting--TK