
STUART is used when color-knitting in the round, best employed with the "two-handed" method. This post shows STUART in action on a long-float project: a skeleton hat. The next post will show a modified version of STUART for going"around corners." But for today, a photo-gallery of the unmodified STUART method applied to this long-float hat.
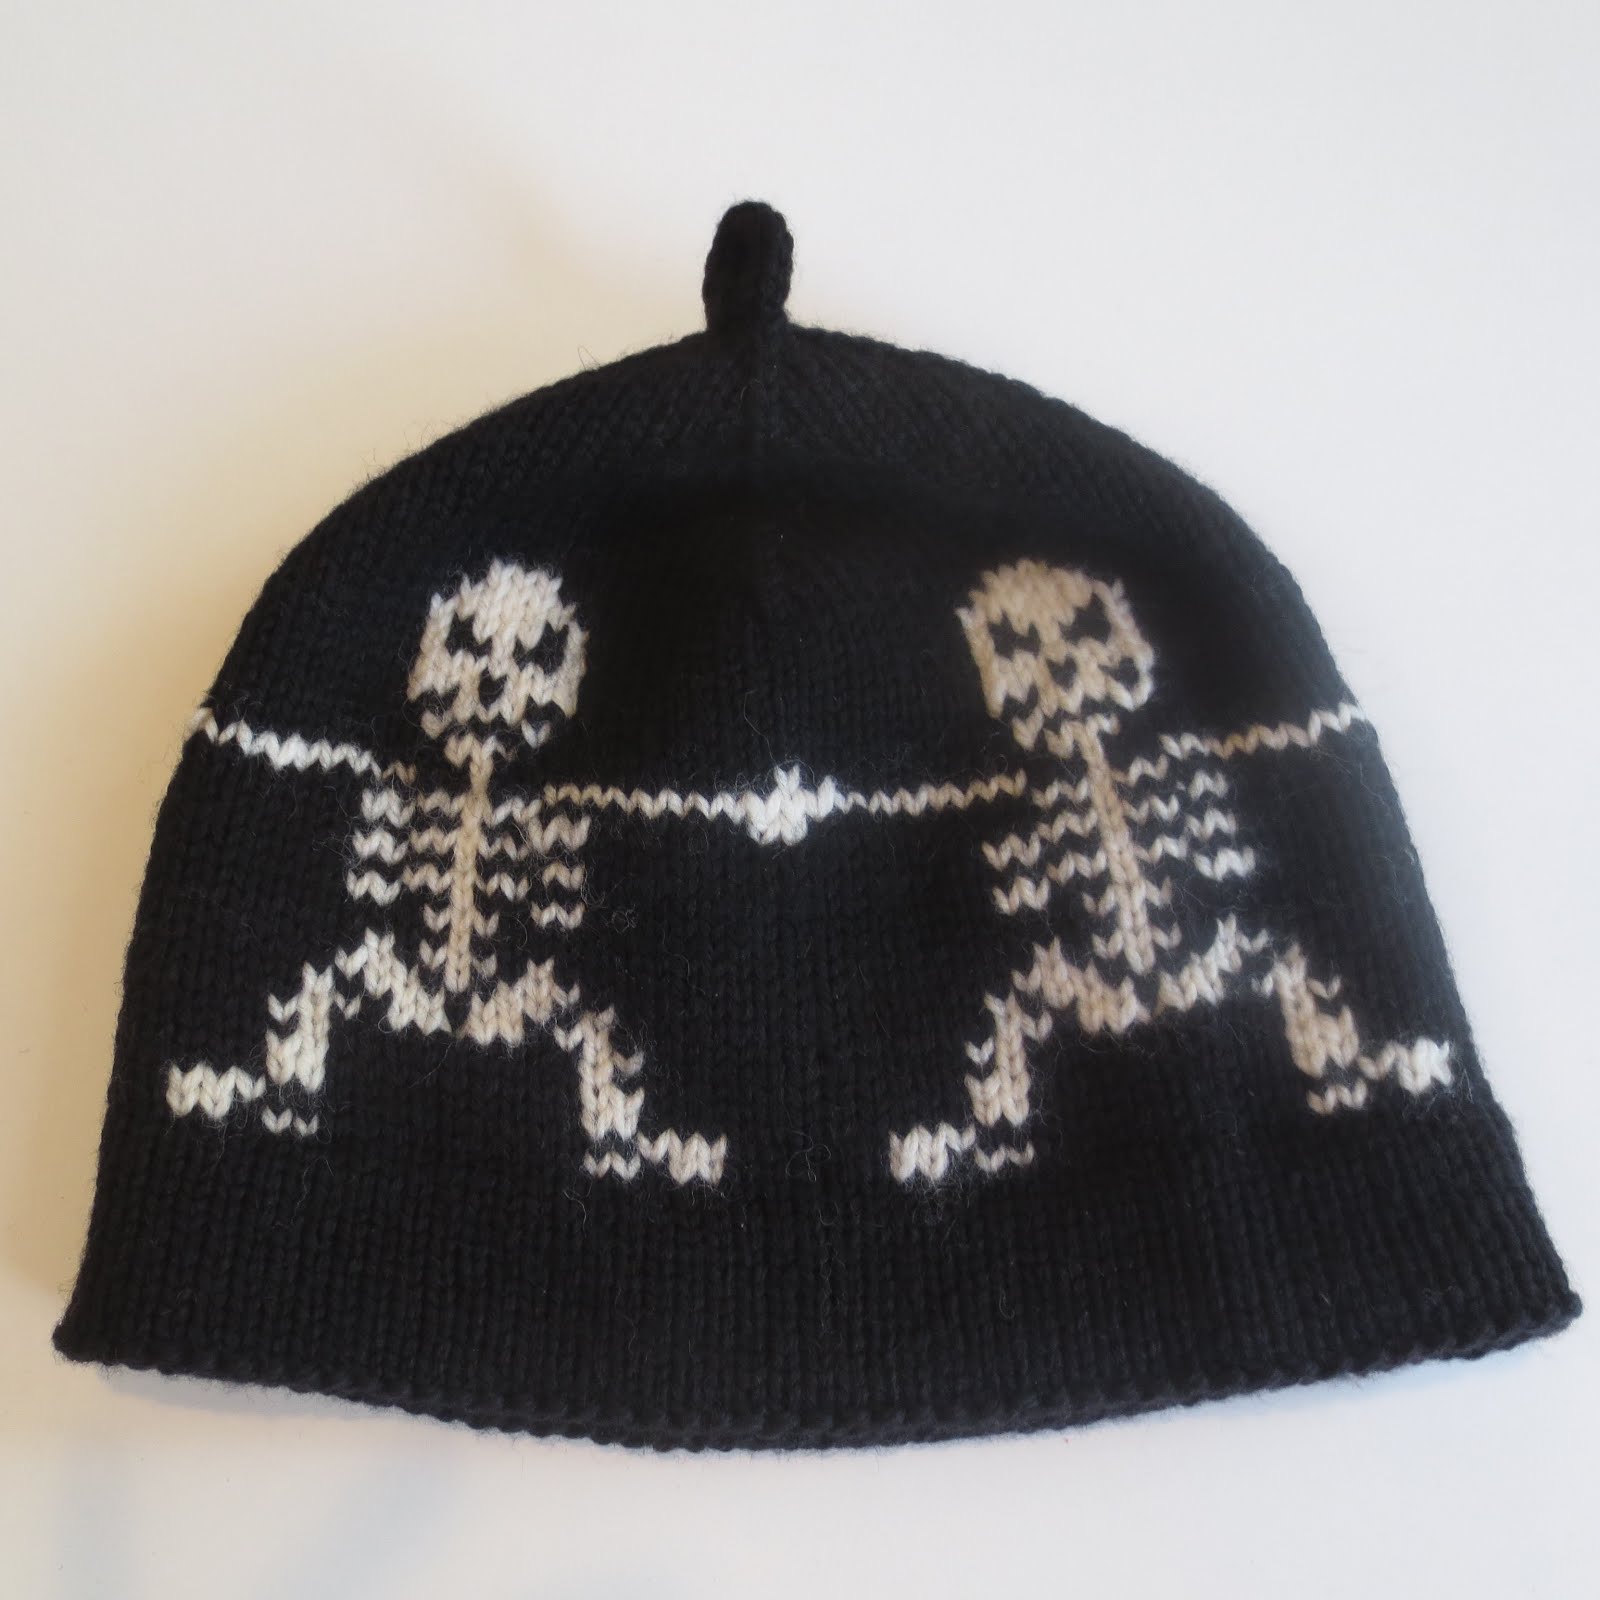 |
A closer view of the skeleton hat, click to enlarge. My version has four skeletons, the original from which it was adapted features six.
|
This wonderful little hat is adapted from the "Round Dance" pattern by Thomas P.* (xeo on Ravelry). This free pattern--once accessible via Ravelry, but now available only through the Wayback Machine archive--features skeletons dancing around the brim--just the thing for an autumn hat. Below is a photo-essay of the hat's construction so you can see for yourself how easy it is to knit looooong floats with the STUART method.
* * *
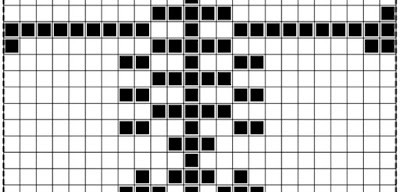 |
You'll have to go to Thomas' (free!) PDF to see the entire chart, but this little snippet, above, shows the heart of the problem: The dotted lines represent the repeats, and you can see the very, very very long floats--23 stitches at the skeleton's "waist."
|
 |
This project featured various sets of floats. as you can see from the opening overview photo. The above photo shows only the floats as they appear between the skeletons. These were very long, yes, but also irregular. In the end, I decided to work only one catchment column between the skeletons, as shown above. This did break the "five-stitch rule" for how far a float should travel, but hey, rules are meant to be broken, right? Let me walk this back a little bit though: unless you have at least *some* experience with long floats, consider adding catchment columns more frequently than is illustrated here, at least til you've tried it out a few times!
|
 |
Above is the catchment column from the inside. Somehow--as you can see in this photo and the previous one-- I slipped two floats under one stitch, probably when I was messing around with dropping stitches experimentally. In fact, I chose this photo of all the ones I took, just to show you that you kind of can't really screw this up. See, all those slips into the catchment column are just "temporary parking spots." When they are let out as part of the STUART process, such irregularities will make no difference to the finished product.
|
 |
Above, I have begun the process of letting out the catchment column: this is the view from the fabric surface. As each fabric stitch (black) is let out, the floats (white) are released to the fabric-back.
|
 |
Above you see the longest floats. These are much too long to even dream of leaving unfastened on the inside of a hat.
|
 |
Above: starting to re-latch the catchment column. Instead of a crochet hook, I am using a large latch hook, the kind you use for latch hook rugs.
|
 |
Catchment column all latched up. Note that even before blocking, there is very little fabric-distortion. This is because the catchment column is knitted with essentially the same amount of yarn as it is re-latched with: there is no excess slack in the front fabric to created gaps.
|
 |
Above: Starting the latch-up of the ladderback. When you have it in your hands, it doesn't look near as confusing as this--it's just hard to operate the camera while holding the work and the latch-hook.
|
 |
The mommy ladderback and her baby ladderback. D'awww. The long floats were so very very long in the skeleton torsos that additional ladderbacks were required to squirrel away the excess float-slack.
|
 |
Mommy and TWO baby ladderbacks in process. I took out the bobby-pins stitch-holders for this photo, normally I would not leave naked hanging loops like that.
|
 |
The finished ladderbacks fastened to the back fabric face per the STUART directions. Note the ladderbacks at the lower edge, above the red hat-facing at each side: these lower ladderbacks are located, one between each skeleton's legs--have a look at the chart and the opening photo to see what I mean...
|
A few notes on the hat construction:
- cast on: In adapting this hat, I began by using scraps of knitting worsted-weight wool and the COWYAK method to provisionally cast on the correct number of stitches for four full repeats at a gauge of 5 st/in.
- facing: After a few rows in waste yarn, I switched to a red sports-weight yarn, and, reserving a tail several feet long, I knit with the red yarn. Despite the thinner yarn, I did not use smaller needles, but instead used the same needles as I planned to work the hat with. I worked 11 rounds of stocking stitch. This created the red hat-facing.
- turning welt: I then knit one round in black, then purled two rounds in black according to the linked directions, thus creating a "beefier reverse stockinette jogless turning welt."
- body of the hat: Switching back to stocking stitch, I worked 13 rounds before beginning the skeleton pattern in white on a black background.
- color work: I worked the skeleton in the STUART method as shown above.
- working the skulls: The skeleton-heads were worked using an intarsia-in-the-round method which I have not yet posted--when I do post about that method, I will place a link here. However, there would be nothing wrong with continuing to the top of the pattern--skulls and all--using the STUART method.
- hat top: beginning two rounds before the end of the skeleton-heads, I established the hat-top decreases as follows:
- Every fourth round, at four evenly distributed spots centered between the skeleton heads, I worked a 3-stitch (non-leaning) decrease.
- At the hat top, I formed the last 4 stitches into an I-cord, then worked that for a sufficient length to create a loop.
- Fastening the I-cord down onto its own base formed a loop at the hat top, a sort of reverse TKIO
- Note that, if you wanted a taller hat, you'd delay starting the decreases until you had worked a few more rounds.
- Finishing: the inside of the hat was mostly finished when the knitting stopped. The ends at the top were pulled into the I-cord with a crochet hook, the insides had few dangling ends because I had worked the STUART method of fastening the ladderbacks as-you-go. Because there is a a facing at the bottom, a lot of the ends were going to be caught behind that, so they really didn't need a lot of delicate fussing--no one will EVER see what's behind the facing. After skimming in those ends which appear above the facing (mostly behind the ladderbacks where you simply cannot see them) the only thing left to do to do was remove the waste yarn from the cast-on and sew the facing down, one overcast stitch per live knitting stitch, using the length of red yarn I had left hanging at the time of the original cast on. I tucked the tail of the facing into the pouch formed by the facing itself, never to be seen again and gave the hat to my teen-age son in time for Halloween. Piece of cake!!
Til next time, good knitting
--TK
This is the second post in a series. The first post introduces the STUART method, the third post shows some modifications of the STUART method for rough-use situations.
--TK
This is the second post in a series. The first post introduces the STUART method, the third post shows some modifications of the STUART method for rough-use situations.
*Thomas granted permission to feature his hat.